When I was in my 20s, I was lucky enough to purchase my own house. There wasn’t much cash left in the kitty, so I began upcycling, recycling and using whatever I had to create my dream home.
Getting crafty is fun but it is also a healthy distraction during tough times. Whenever I have moments of uncertainty or when I feel overwhelmed, picking up a paintbrush or a needle and thread takes me away from my worries. It seems like such a simple thing, refreshing a piece of furniture or sewing a cushion, but there is a feeling of joy and satisfaction and accomplishment; pride in making something new or transforming something old.
Here are some ways to reignite your creativity.
Teacup bird feeders
If you have spare bits of mismatched china, why not use them to serve some seeds to the birds in your garden? I love to leave food out for my local birdies and watch them play from my kitchen window. When you start feeding birds in your garden, you will notice the many species that live amongst us. I have a robin who visits, he prefers to eat the seed that falls on the ground. Other smaller birds like the blue tit and chaffinch happily swing and eat from bird feeders. Having a mix of tables and feeders will cater to most birds native to your area.
What you need:
1 A china cup and a plate
2 Strong glue adhesive
3 Tape
4 Strong twine or chain
5 Metal hooks
When choosing china, the lighter the better. Check for cracks or chips, as these could injure a bird’s leg or claw. Wash your teacups well to remove grime. The glue is the essential part of this project. Choose adhesive that requires time to set. You want it to be strong enough to hold the weight of the plate, seed and bird. I like to use E6000 or Gorilla Glue.
Position the cup in the centre of the saucer, on its side. Apply a bead of glue to the saucer and firmly place the cup on top. Use some tape to hold the cup and saucer together while the glue cures. You can sit the teacup feeder on a shelf, or you can hang it. To hang, add either a sturdy piece of twine or a thin metal chain to the handle of your cup. The string shouldn’t be too long – around five or six inches, depending on what you are hanging it from – as we don’t want the teacup to over-swing or blow around too much in the wind. Add a hook to a wall or a wooden palette like mine and hang your bird feeder from it. You can also hang it from the branch of a tree.
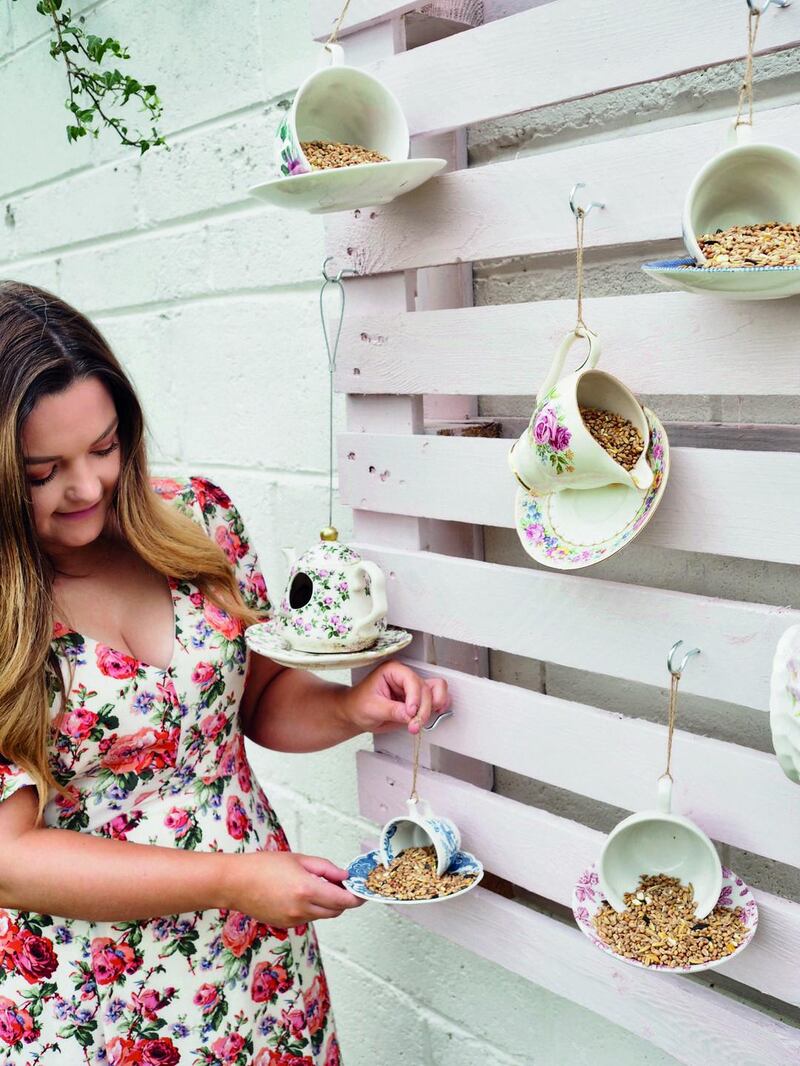
It is best to keep your teacup feeders in a sheltered area, away from harsh winds and weather. Check your feeders regularly for any sign of deterioration and clean them with warm water to help stop the spread of disease and bacteria. It may take a week or more for the birds to discover your new feeders, but when they do, I promise that you will have some regular visitors to your garden.
To make a sturdier teacup feeder, instead of using glue, you can drill a hole of the same size in both the cup and plate, then use a screw and nut to secure the cup to the plate.
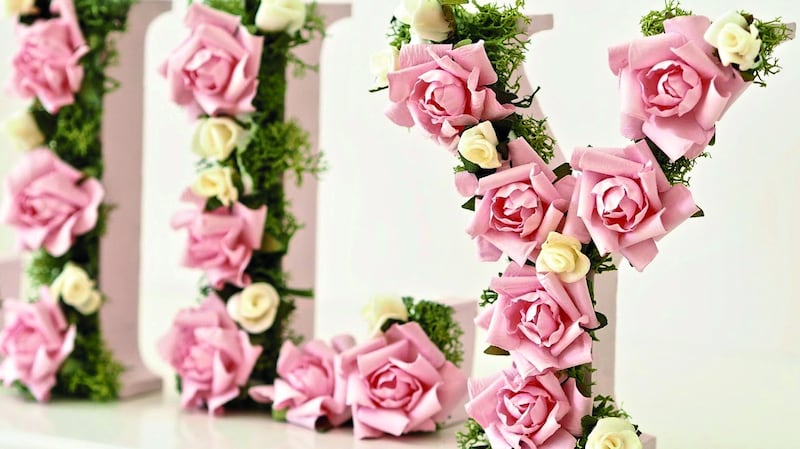
Flower letters
There is nothing like getting a personalised gift or creating something bespoke for yourself. I originally made these for my baby niece’s nursery, but they would be a fab wedding DIY too. These floral letters can stand on a shelf, or you can put them inside a shadow box. Get creative with your choice of flowers, and you will have a unique and personal display for your home.
What you need:
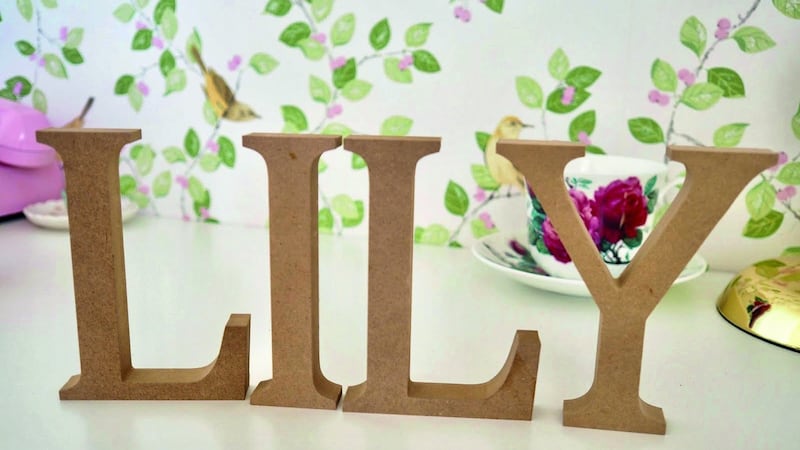
1 MDF wood letters
2 Paint (optional)
3 Hot glue gun or stronghold glue
4 Faux flowers and moss
You can find wooden MDF letters in most craft stores and online. They come in various sizes and heights. I chose to paint my letters with some pink paint from an old tester pot, but you can also leave the natural wood for a rustic feel. Depending on the paint you use, you may need to apply two coats. Paint them all over, including the front, in case any wood shows under the moss.
Faux flowers and moss work best for this DIY, as fresh won’t last very long. Choose flowers that are not too large and think about the overall colour palette. If you plan to have your letters freestanding on a shelf, use lighter paper flowers and be careful not to overload. Test them as you go along to see if they’re standing well. If the letters are to go in frames or a shadow box, you have more freedom.
First, glue the moss in small sections using a hot glue gun or a stronghold glue. Avoid PVA glue for this project, as it takes longer to dry. Once the glue is dry, start on your flowers. It’s a good idea to arrange them first, before gluing, as you can play around with the positioning. I added the larger flowers first and then went in with the smaller ones. Allow the letters to fully dry before displaying.

How to paint flat-pack furniture
I see lots of flat-pack furniture down at the recycling centre. These cheaper items can be seen as disposable and end up in landfill once they’re no longer needed. MDF and veneer finishes can be slightly harder to paint, but not impossible – I have lots of painted flat-pack items in my home, and their paint jobs have lasted very well.
Custom built-in furniture is popular at the moment, as it can give you lots of storage in a small space. I needed to store my ever-growing collection of craft supplies – I was getting tired of tripping over paint pots and sewing fabrics! – so this seemed like a budget-friendly and practical solution. I already had a small storage unit in my office, and I got a free second-hand sideboard to use as the base. I decided to stack them to create the frame for my storage wall. When stacking or creating large walls like this, remember to anchor the furniture to the wall using brackets for safety. Ensure the wall you choose can bear the load of the furniture.
I used wood moulding from the hardware shop to add detail to the top, creating a custom built-in effect. To secure the moulding to the top, I used wood glue and my nail gun, and I then used decorators caulk to fill the joints and give it a seamless look. Once I was happy with the base of my storage wall, it was time to prep the furniture pieces for paint. Here are my tips for getting the perfect paint finish on MDF and veneer finishes:
Clean your furniture with a degreaser. Even if it looks and feels clean, there can be grease from fingerprints or unseen grime. Sand the surface. When painting MDF, which has such a smooth surface, this is an important step – you want to give the paint something to grip onto.
Check for any damage and use a wood filler to patch up holes or chips. Choose a primer that has been designed for use on difficult surfaces such as MDF, UPVC and melamine. Once your primer is dry, apply two coats of your topcoat of choice. For my piece, I went for a satin finish as it’s easy to clean.
If you’re unsure about your choice of paint, test a small area first, making sure the primer has had 24 to 48 hours to dry beforehand. The bottom sideboard I used had a previous paint job, so I needed to spend some time removing the old, flaky paint. Using an electric sander I smoothed out old brush marks and got the surface as smooth as I could for painting. I also had to patch up old holes in the wood from the handles. I used gold spray paint on all the handles to give them a uniform look. Some of the knobs are wooden and some metal, but you can’t tell the difference, and it kept my budget down. When you look at the “before” image of the sideboard, I can see why many people would bring it to the recycle centre. However, I hope that the end result gives you the inspiration to rescue some flat-pack pieces and give them a new lease of life.
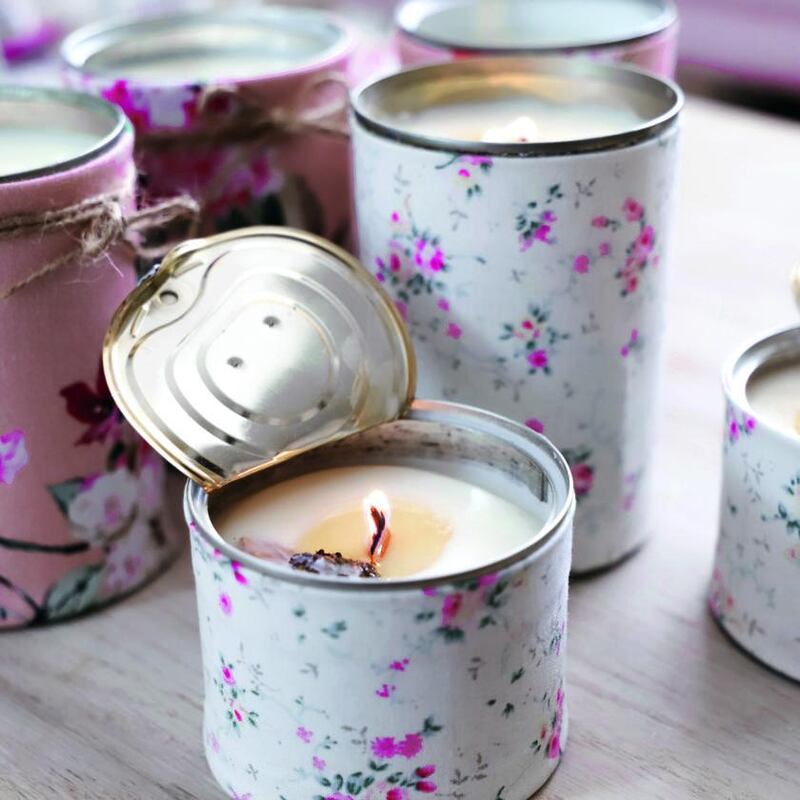
Tin can candles
Have a rummage in the recycling bin, and you will usually find some old tin cans. There are endless ways to upcycle tins – use them as vases or plant pots, bird feeders, wind chimes, even for baking bread. I will share how to turn them into scented candles. I used fabric scraps on the outsides, but you can use techniques from previous chapters to paint and decorate them
What you need:
1 Tins cans
2 Sandpaper
3 Saucepan
4 Heat-resistant bowl
5 Candle wax
6 Essential oils
7 Candle wicks
8 Candle-making thermometer
9 Glue gun
10 Scrap fabric to decorate
For this project I used soy wax and wood wicks. Before you start, leave your tin cans to steep in warm soapy water for a while. The labels will fall off, and then you can give the outsides a good clean. The edges of metal cans can be sharp; to avoid any unwanted cuts, use some sandpaper to soften the sharp edges.
Create a double boiler by heating water in a saucepan and adding a bowl on top. Add your wax flakes to the bowl. I melted 1lb (454g) of wax, which was enough for two large candles, but you can double up if you’d like a bigger batch or split it into three smaller candles.
Once the wax has melted, take it off the heat and add your scent. I added one tablespoon (15ml) of essential oils per large candle – two tablespoons (30ml) for the whole 1lb batch – which is quite light. It was summer when I made mine, so I used a blend of citronella and peppermint. When it comes to adding your essential oil to wax, the optimum temperature is between 85°C and 93°C (185°F and 200°F) depending on what wax you melt. Use a candle thermometer to check the temperature.
Add wicks to the base of the tin cans, securing them with a dollop of glue. If you use cotton wicks, you can use a chopstick or spoon to hold them in place as you pour. Very carefully, pour the wax into the tins and allow them time to set.
Once your candles have hardened, it’s time to decorate. I cut scrap fabric pieces that were slightly larger than the cans, and I ironed over the raw edges on all sides of the fabric. I used my glue gun to stick the fabric to the cans and added some string around the middle for decoration.
Instead of fabric, you could paint your tins with some chalk or acrylic paint and use a stencil to add design. I always say, take the idea and make it your own!
Extracted from Dainty Dress Diaries: 50 Beautiful Home Crafting Ideas to Awaken your Creativity, by Catherine Carton. Published by The O'Brien Press (€19.99) on May 16th. Catherine also shares her ideas on her interiors and lifestyle blog, daintydressdiaries.com