Right now, our snowmageddon world is split right down the middle: those who have bread and those who do not.
Those who do not are possibly undergoing the strongest carb cravings they have ever experienced. Those who do may be eyeing their ballast of best batch and wondering how they’re ever going to get through it all.
For both camps, we have some snow day suggestions.
First up, it’s the have nots, and some ways to sort out their situation.
Remember a few years back when the internet went wild for that loaf that didn't need any kneading at all and that you baked in your Le Creuset casserole?
Well, not since Sullivan Street Bakery's Jim Lahey dreamed that one up has a bread recipe and method ticked as many boxes as Irish Times Magazine columnist Carmel Somers's recent instructions for a simple dough that once made can be cooked four ways, or stored in the fridge (for up to two weeks), waiting for the moment you just can't go on without a slice of fresh baked bread ... like today, for instance.
You can read how to use the dough to make pizza, flatbread and frying pan bread here, and below is the basic loaf recipe.

Good Things White Loaf
This recipe will make one large loaf, or you can keep some dough back to make a pizza and make a slightly smaller loaf.
If you are making it by hand do think about doubling the quantities (double quantities are not good for your domestic mixer) and making two loaves and putting one in the freezer.
Or make one loaf and also have dough in your fridge to make any of this week’s other recipes. You will be surprised how handy having a bit of dough will be when planning a meal.
Ingredients
500g white bread flour – also known as strong flour
1 x 7g sachet of Instant dried yeast
1 ½ teaspoons salt
350ml lukewarm water – not hot, not cold
Method
1. In a large mixing bowl mix the flour, yeast and salt together. Next add in most of the water (hold a little back) and mix well with a wooden spoon to form a dough. Continue mixing until the dough has come together and the bowl is clean. If your dough is a little dry add the remaining water and if it is a little sticky add a little more flour.
2. Generously flour your work surface, and turn the dough out on to it. Knead the dough for about 10 minutes, until it is soft, springy and clean. You might need to sprinkle a little flour as you go if the dough is sticking to your hands or surface. Your hands should be clean of dough as you work. This should be a relaxed affair so don't overwork the dough (you will end up with a heavy loaf and tense shoulders)
3. Alternatively you can put all the ingredients into the bowl of an electric mixer and mix on a low speed using the dough hook.
4. Place the dough back in the bowl (or leave in mixing bowl if you're using electric mixer), cover it with a tea towel and put it somewhere warm, but not hot, for at least an hour in summer and two in winter. Or you can leave it overnight covered with cling film.
5. Once the dough has doubled and is light with a few little bubbles on top, tip it out on to a floured surface, give it a quick knead and shape it into a round ball and place it on a floured baking sheet. Dust it with flour ( I like to use a handful of brown flour here as it gives the loaf a nice colour) and leave to rise again – this should take from 30 to 45 minutes depending on the time of year.
6. Set the oven to 250C/Gas mark 9. Do this 15 minutes before the bread is ready to go in the oven.
7. Place the bread in the middle of the oven and bake for 20 minutes, then lower the heat to 220C/Gas 7 and give it another 10 minutes. Check the bread for doneness by tapping the bottom of the loaf; it should sound hollow. If not give it another few minutes. Let the loaf cool on a wire rack.
If finding a packet of dried yeast and strong flour in your baking cupboard is a bit of a stretch for the day that’s in it, you could satisfy those carb cravings by making a batch of Jamie Oliver’s frying pan flatbreads that need only self raising flour, natural yoghurt, salt and olive oil.
These, from his most recent book, 5 Ingredients Quick and Easy Food, are simplicity itself to make: just mix three heaped tablespoons of self raising flour with a pinch of salt, three tablespoons of natural yoghurt and one tablespoon of olive oil. Split the dough in two, roll out on a floured surface, and fry for three minutes, turning once.
I found that this dough needed a bit more flour added to make it workable for me, but they still tasted great. It is a delicate dough, but forgiving - who cares if your flatbread is a bit raggy round the edges.
The smug have-bread camp might need a bit of inspiration as they contemplate how to dispatch the batch. There are only so many ham and cheese toasties one can eat, after all.

Bread loves soup, especially on a day like today, and Lilly Higgins unites them harmoniously in this red pepper soup that comes with a cheese toastie alongside, making it a complete meal.
Roasted red pepper soup with Welsh rarebit
Ingredients
Serves 4
600g tomatoes
2 red peppers
2 red onions
15g basil leaves
450ml chicken or vegetable stock
Salt and black pepper
2 tsp Dijon mustard
60ml beer or stout (I like Eight Degrees Knockmealdown Porter)
60g butter
2 tsp Worcestershire sauce, to taste
350g mature farmhouse cheese, grated
Salt and freshly ground black pepper
2 eggs plus 1 egg yolk
4 slices of bread
Method
1. Preheat the oven to 200C. Roughly chop the tomatoes and peppers and place on a large baking tray.
2. Cut the onion into thick wedges and add to the tray. Drizzle with oil and season well with salt and pepper. Roast for 30 minutes till the onions are slightly singed at the corners and the the peppers blistered. Set aside to cool slightly.
3. Blitz the roasted vegetables, along with half the basil. Sieve the soup to ensure it is smooth and creamy. Discard the skins and seeds that are left. Add stock to the smooth roast vegetable puree till the desired consistency is reached. Taste for seasoning. Set aside and keep warm.
4. Next make the Welsh Rarebit. Mix the mustard and a little stout to make a paste in a small pan. Add the remaining stout, the butter and the Worcestershire sauce.
5. Gently heat until the butter melts. Stir in the cheese to melt, but don't let the mixture boil. Stir until smooth, then taste for seasoning. Remove from the heat and keep slightly warm while you toast the bread.
6. Heat the grill and toast the bread on both sides. Beat the eggs and yolk into the cheese sauce. Once smooth, spoon it generously onto the toast and grill until bubbling and golden.
7. Ladle the soup into bowls and serve with the warm Welsh rarebit toasts.
Higgins, the queen of soups (have you tried her butternut squash and coconut one, it's gorgeous, and made even easier with this squash cutting tip from a reader), also marries bread with a ton of healthy veg and beans in this Italian inspired recipe. If you haven't got cannellini beans, use whatever canned beans you have, or chickpeas.

Ribollita and Parmesan toast
Ingredients
Serves 6
3tbs olive oil
1 large onion, finely diced
2 large cloves of garlic, crushed
2 large carrots, peeled and diced
3 sticks of celery, finely diced
2 400g tins of chopped tomatoes
1 400g tin cooked cannellini beans, drained
3 sprigs of rosemary
4-6 sage leaves
1tsp thyme leaves, finely chopped
800ml stock
500g cabbage or kale, stems removed and shredded
150g day-old sourdough bread
50g Parmesan, grated
Salt and black pepper
Method
1. Heat three tablespoons of olive oil in a heavy-based pan. Add the onion, garlic, diced carrot and celery. Lower the heat and place on the lid. Leave to soften for five to 10 minutes. Add the tinned tomatoes, beans, herbs and stock. Bring to the boil, then lower the heat and simmer for 20 minutes before removing the sprigs of rosemary and sage. Then add the shredded cabbage. Place the lid on and leave to simmer for a further 10 minutes. Season with salt and pepper to taste.
2. While the soup is cooking, prepare the toast. Tear or cut the bread into cubes. Drizzle with olive oil, and season with plenty of salt and black pepper. Bake at 200 degrees for five minutes, then turn and scatter the grated cheese over. Bake for a further five to eight minutes until the cheese is golden and the toast crisp.
3. Divide the warm soup between four shallow bowls and top with a few pieces of Parmesan toast before serving.
So the takeaways are closed, and the Deliveroos are off the road, and you can’t shake that hankering for Chinese food ...
Here’s where that pile of sliced pan can come to the rescue again, provided you can lay your hands on a bag of prawns - frozen, defrosted will be fine - and at a push a can of prawns in brine would work.
Donals Skehan’s recipe has quite a few steps, but sure what else would you be doing on this snowy day?
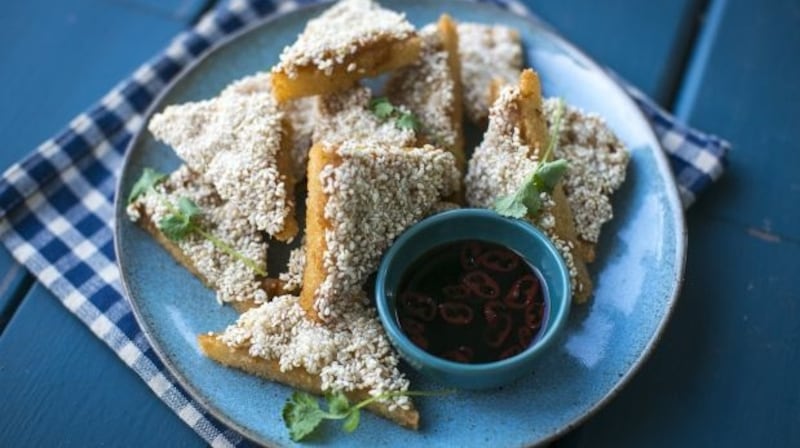
Sesame prawn toasts
Ingredients
Serves 4
200g raw prawns, de-shelled
1 egg white
1 thumb-sized piece of ginger, finely grated
1 garlic clove, finely grated
1 tbsp soy sauce
2 tsp sesame oil
1 tbsp cornflour
A pinch of salt
A pinch of white pepper
5 tbsp sesame seeds
5 slices of white bread, crusts removed
Sunflower oil for frying
Method
The method for this recipe is simple and results in a sweet and savoury appetiser. They are best served soon after they are fried. The use of white pepper is also important here, although both white and black pepper come from the same plant, white peppercorns add a light and unique spiciness commonly found in Chinese cookery.
1. Finely chop the prawn meat and then combine it, in a bowl, with egg white, ginger, garlic, soy sauce, sesame oil and cornflour until mixed through. Season with salt and white pepper.
2. Cover and place in the fridge to chill for 30 minutes.
3. Slice the white bread slices diagonally into quarters. Spread about one heaped teaspoon of the prawn mixture on each triangle until it is completely covered on one side. Sprinkle the sesame seeds over it and press in gently.
4. Fill a high-sided frying pan with 4-5cm of sunflower oil and place over a medium high heat. Test it is hot enough by frying one of the crusts – it should turn golden brown.
5. Lower each prawn triangle, meat side down into the hot oil and fry for two minutes before flipping over to fry for a further minute or until golden brown.
6. Remove from the hot oil and drain on a plate lined with kitchen paper.
7. Serve while still warm garnished with coriander and some soy sauce for dipping.